

Visual Studio
Configure the Visual Studio Environment
In Visual Studio (VS), an application is the compiled assembly (the .exe executable) usually given the name of the namespace which is the approach we will take. It is not uncommon to use the words application and project interchangeably. For instance, we have the option of creating Applications in the New Project dialog.
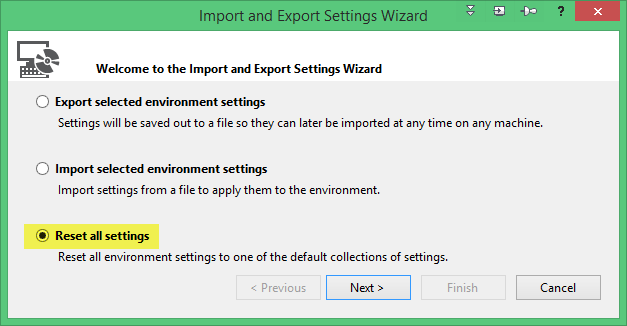
A solution is a container that can hold multiple projects. In many cases, developers will only have one project per solution but it can be convenient at times to include multiple projects within a solution which we will do in a future chapter. Before working our first VS project, let's make a few configuration selections that make working with VS more efficient and enjoyable. When you installed VS, you should have selected the C# environment. However, if you did not, it can be set at any time which we will do now. Select Tools | Import and Export Settings... to see the dialog below. Select Reset all settings | Next.
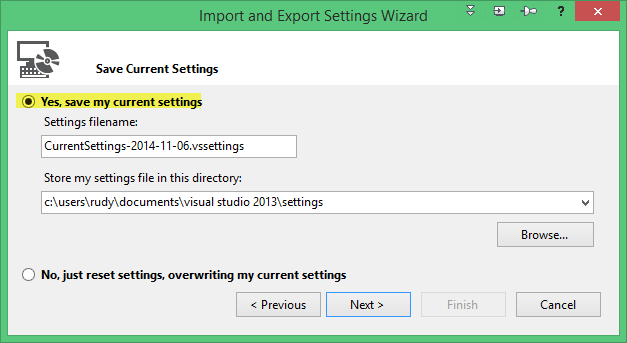
In the Save Current Settings dialog, select Yes since it is a very small file and it is a good practice. Select Next.
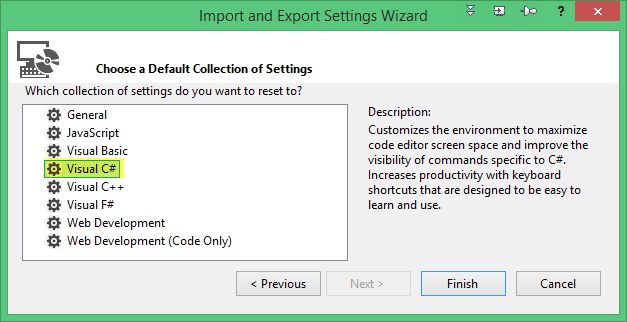
The Choose a Default Collection of Settings dialog is the key. Select Visual C# | Finish.
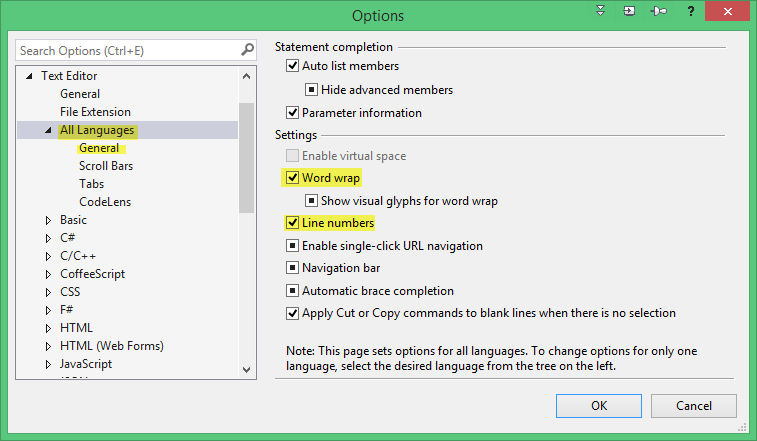
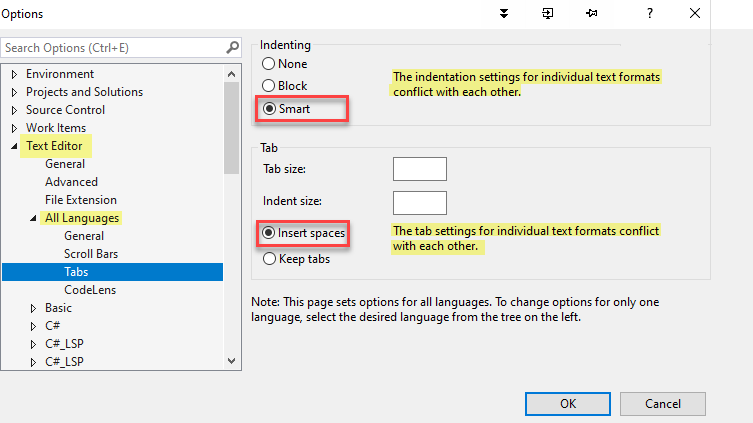
If you have not done so, I recommend displaying line numbers and enabling word wrap. Both are located at: Tools | Options | Text Editor | All Languages.
The next two settings I like to apply are for indenting. The Smart indenting sets new line indents to the appropriate level. I suggest the Insert spaces setting since spaces are more universally processed correctly than tabs. Notice the conflict warnings that appears and is highlighted if the option is not selected. By the way, I recommend retaining the default setting of four spaces since it is the most common.
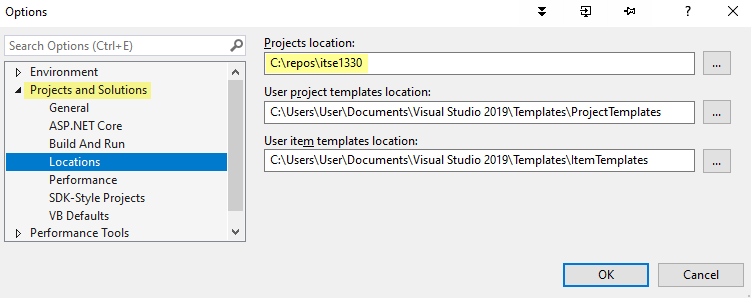
In Tools | Options | Projects and Solutions | Locations. Set the Projects location to the folder where you want projects saved by default.
We are now ready to create a solution and a project within that solution. Recall that a solution is a container that can hold one or more projects.
My First Project
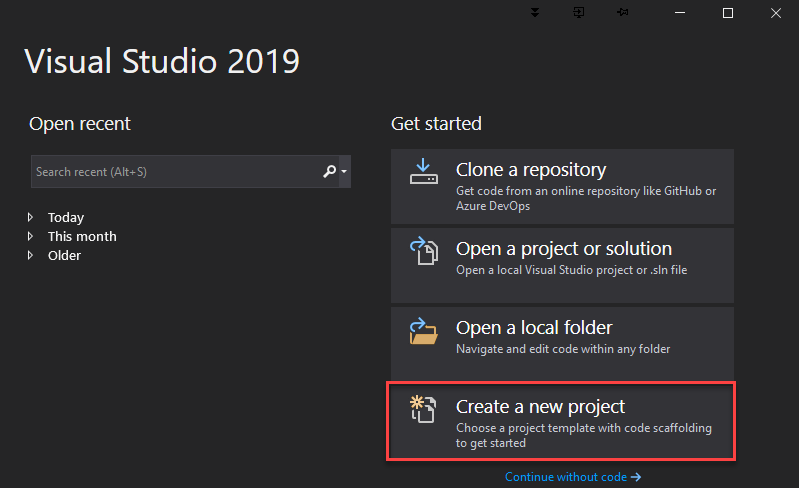
Now we are ready to create our first VS Project. Open VS and create a new project by either selecting Create a new project. A new project can also be created after VS is fully open by selecting File | New Project. By the way, this may be your 7,999th VS project. If so, get ready to create your 8,000th.
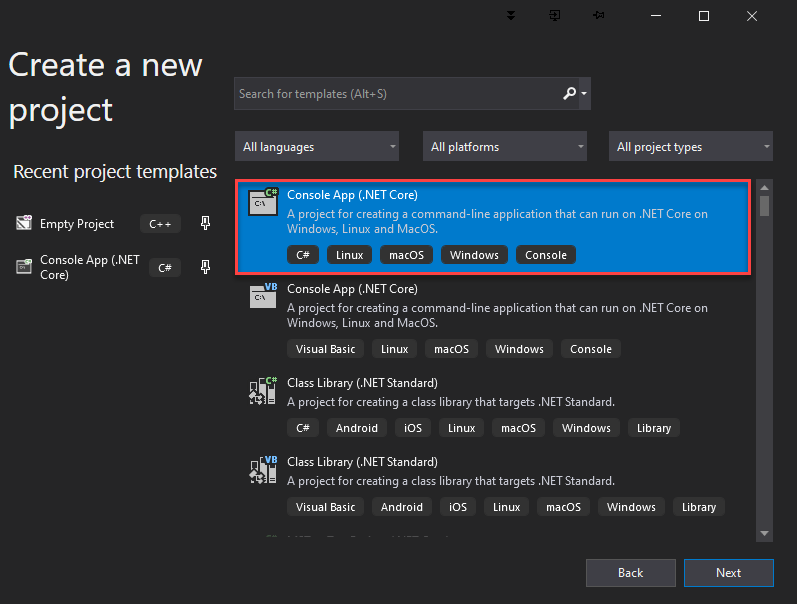
In the Create a new project dialog select the Console App (.NET Core) option. Be sure to select C# since there is also an entry for VB.NET. Select Next.
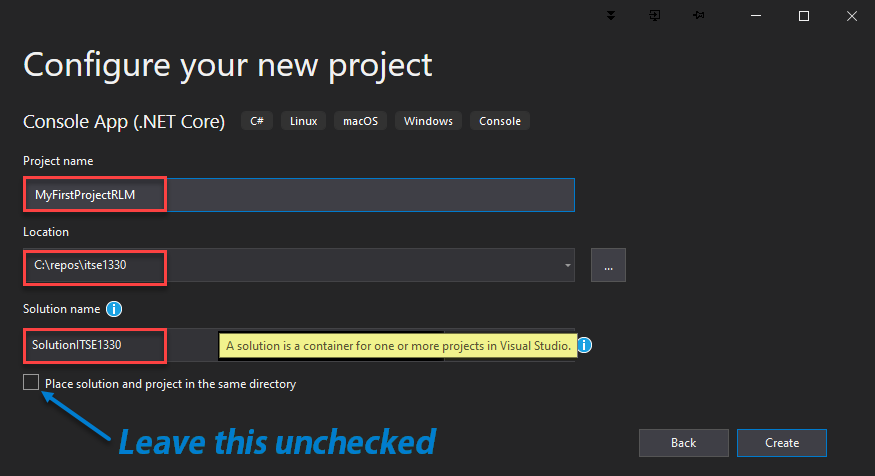
Make the settings as shown. Replace RLM in the project name with your initials. Recall that a Solution is a container for one or more projects which is what the tool tip shows next to Solution name. Select your location which should already be set to the default we set earlier. Leave the checkbox unchecked because we want the solution to be in a higher directory than the project so the solution directory can contain many project directories.Select Create after the settings have been made.
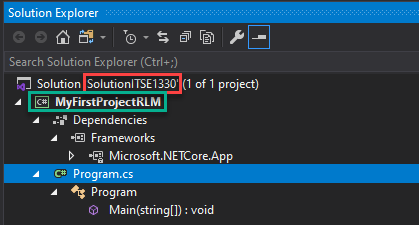
Notice the Solution name (SolutionITSE1330), the Project name (MyFirstProjectRLM), and the Program.cs file in the Solution Explorer. Keep in mind when working VS, to make settings at the Solution level, R-click on the Solution name. To make settings at the Project level, R-click on the Project name. We take those actions below.
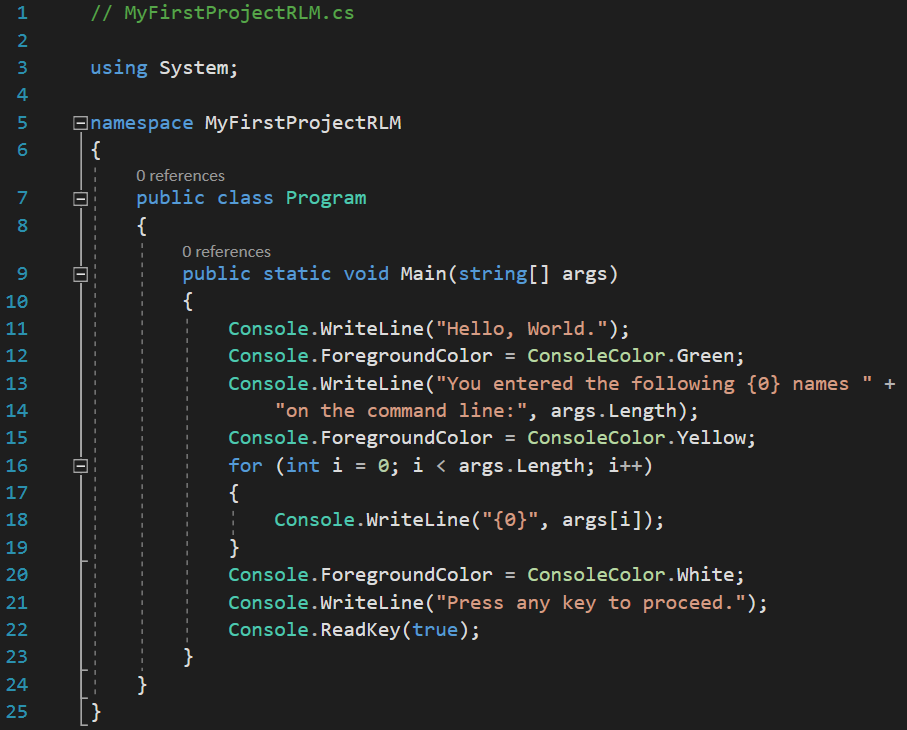
The Program.cs file should be open, if not, open it by D-clicking on the file name in Solution Explorer. Replace the contents of Program.cs with the content shown below.
Notice that Program.cs, the class that includes our Main procedure, contains a using statement that VS automatically supplies with a new console Project. Notice that the default file name is Program.cs and that is also the class name as shown on line 7. This class includes the Main method (line 9) which is the project starting point. During this course, we will continue to use Program.cs as the name for the class that contains the Main method. We are then able to more consistently identify the class containing Main when we have multiple classes in our project. The project name MyFirstProjectRLM is also the name of the namespace on line 5. When we run the Project, an .exe assembly is automatically generated with our project name. Notice on lines 12, 15, and 20 the console foreground color (the text color) is changed. To keep the code segments small, most of the code examples in the course do not include console enhancements. However, this is a valuable technique to make the output easier to follow. Students are encouraged to employ various text colors to enhance the console output. More on console text color options here. Be careful though to not degrade readability with color choices. For instance, dark blue text on a black background can be illegible.
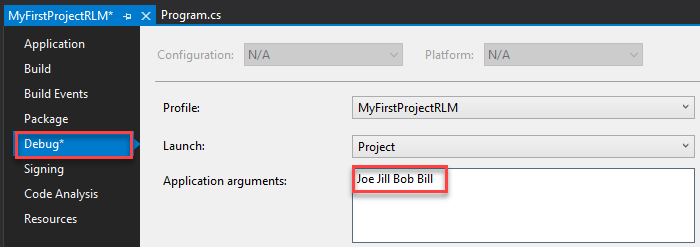
Recall that HelloWorld2 was written to accept names on the command line when the program was started. We accomplish that in VS by the menu Project | MyFirstProjectRLM Properties or by R-clicking the project name in Solution Explorer and selecting Properties. The Properties window opens. Select Debug and enter a few command line, or Application arguments like shown. Select the Save button or use Ctrl-S to save the arguments.
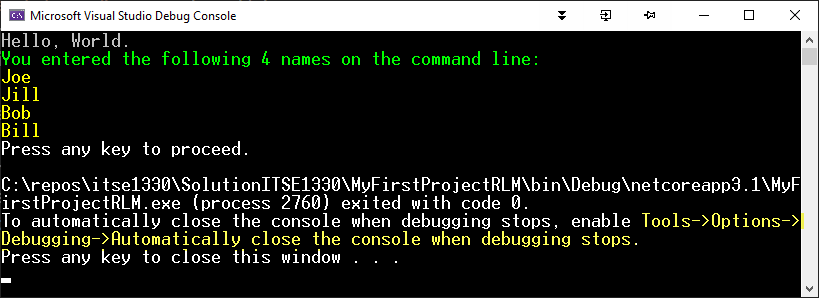
We are now ready to run the Project which can be done a number of ways (pressing F5, or from the Debug menu, or the Start button  ). You should see the output below.
Notice the highlighted lines in the output beginning wth Tools. That is indicating a setting which can be set to automatically close the console after the program completes. I recommend that setting and we will do that next.
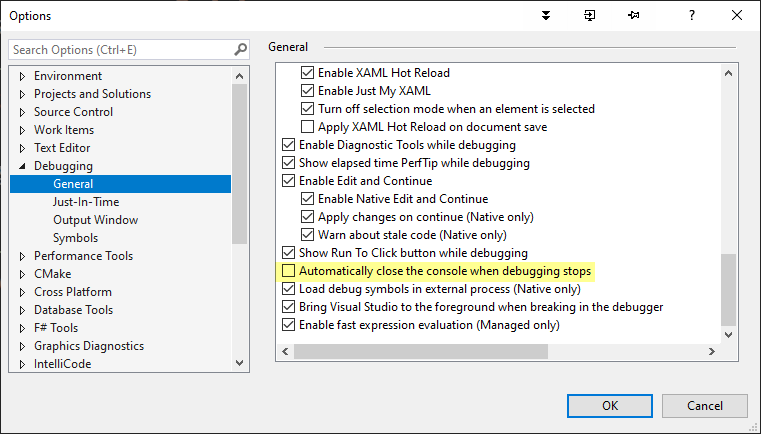
In Tools | Options | Debugging | General select the box highlighted. However, if you do set it, you will need a ReadKey() to pause the program like line 22 in our code above.
Let's take a look at the .exe file produced when we selected to start debugging. Navigate to the folder as shown. The file MyFirstProjectRLM.exe is an assembly which contains the MSIL for the CLR to execute. You can D-click that .exe fle to run the Project. Recall the .NET components like the CLR are required for the Project to run. The other files in the directory provide information and support for the VS debugger and other configurations.
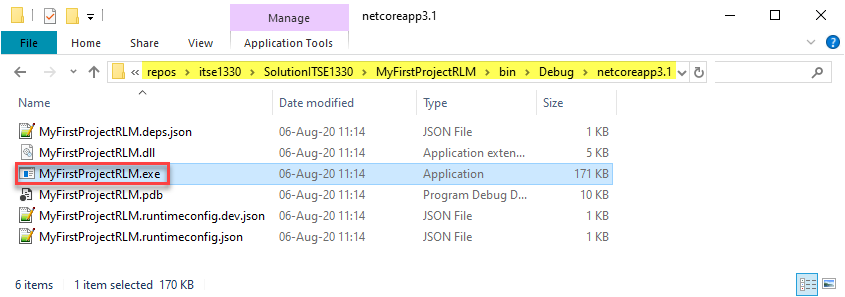
D-click that file to run the Project again. Note that the command line arguments loaded in VS are not recognized since the Project is not being run from within VS.

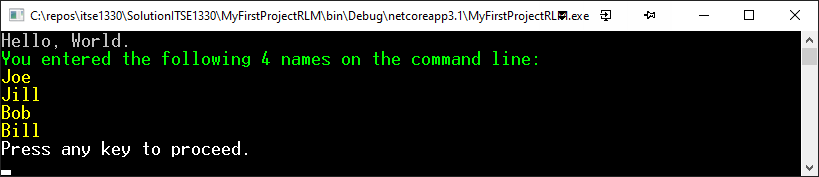
Back in VS, press F5 to run the debugger again. Now the Application arguments are processed and displayed. And, after pressing any key, the console window closes based on our setting above to automatically close the console window after the program runs.
The Project .exe will run on any Windows platform with a compatible version of .NET installed.
Adding Multiple Projects to a Solution
As mentioned above, we can work with VS and have one project per solution. However, it is often convenient to have multiple projects in one solution. I recommend that approach for this course.
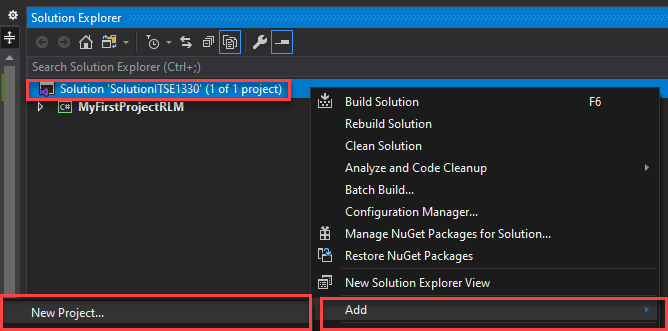
Let's now add a project to our existing solution. R-click on the solution name (NOT the project name) | Add | New Project... It makes sense that we R-click the solution name since we are adding a project to the solution.
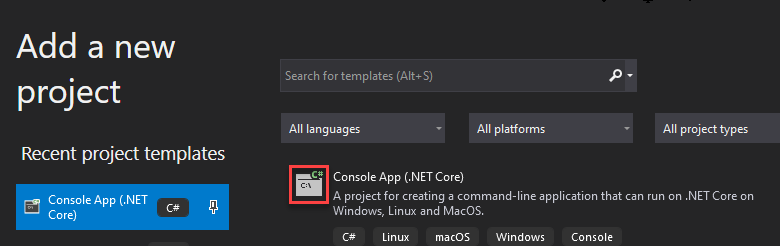
Select Console App (.NET Core) again. You can select the template on the left or the larger selection on the right. Be sure to select C# since there is also an entry for VB.NET.
Name the project ProjectTemplate as shown. Leave the location set to the current project.
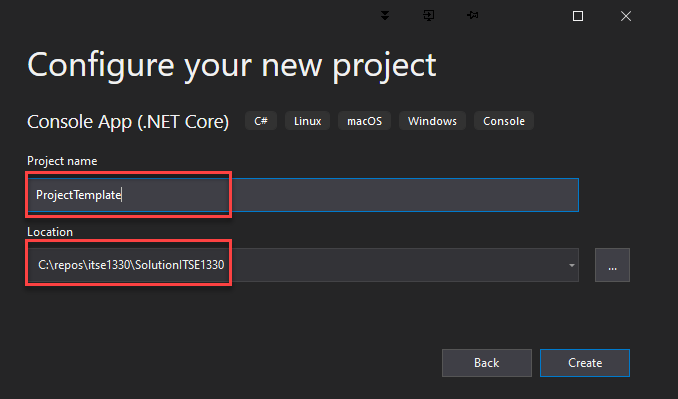
Notice that the ProjectTemplate project appears in the project list in the SolutionITSE1330 solution. Leave the location set to the current project.
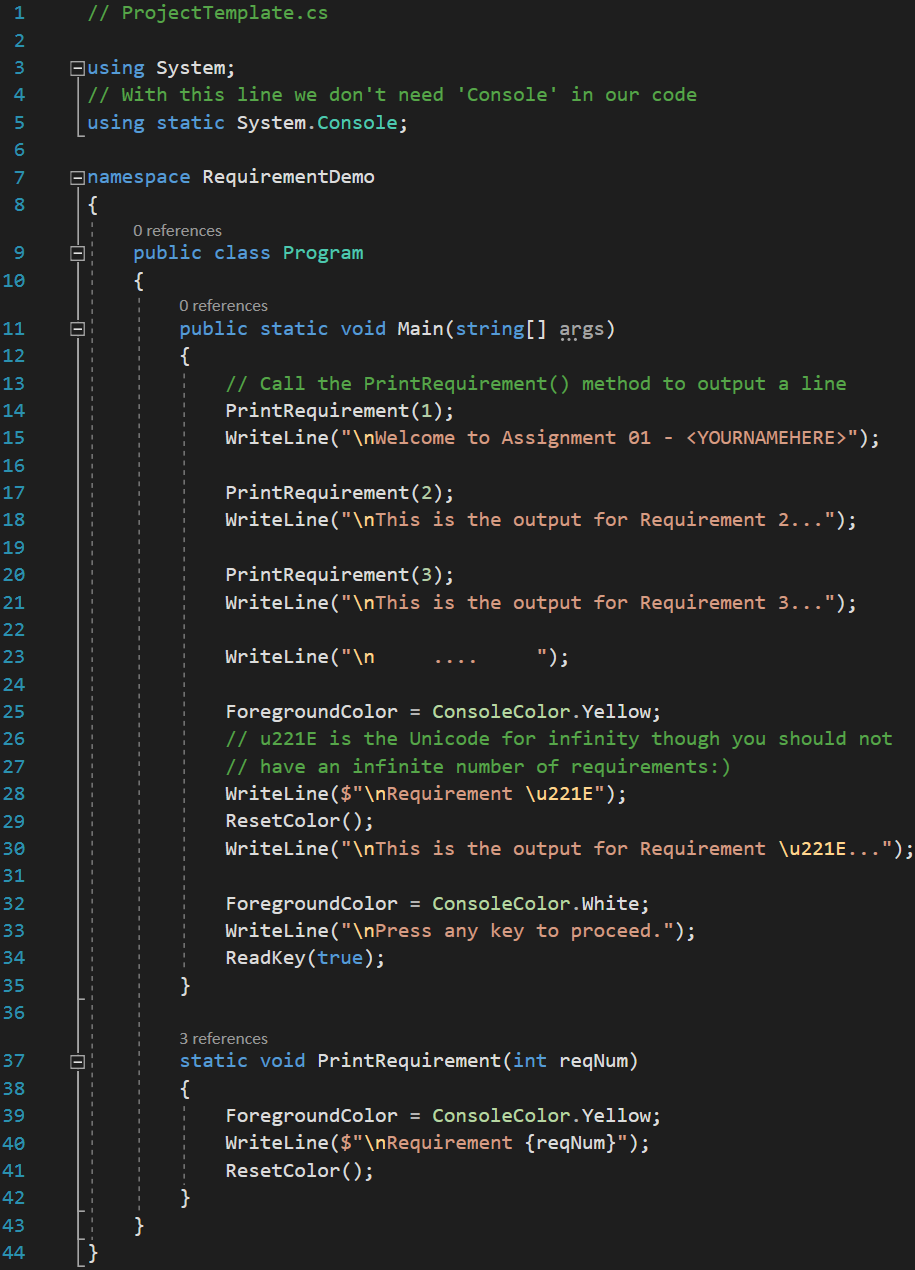
Code the Program.cs file for the ProjectTemplate as shown. Let's discuss the code a bit. This a proposed template that you should use to start your VS command line projects. When you are ready to start a new project, simply go through the previous steps to create the new project. And then, copy this code to get started.
After copying, you should immediately change lines 1 and 7 to reflect the project name.
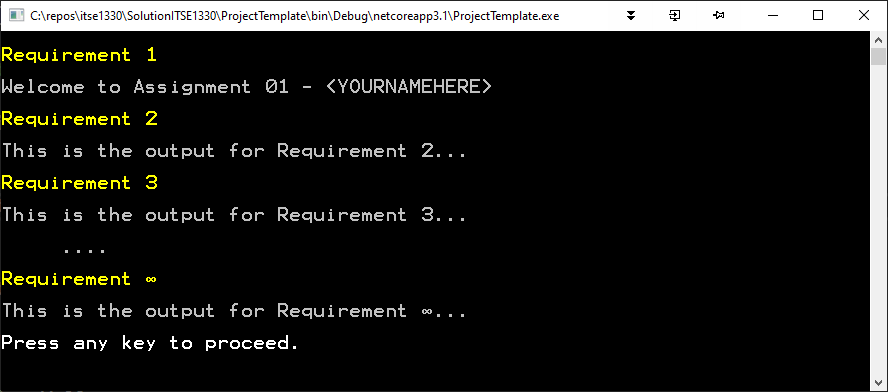
Line 5 is included so Console does not have to be used on lines 15, 18, etc. After coding and running, try commenting line 5 to observe the behavior. On lines 14, 17, and 20 the PrintRequirements() method is called. That method is defined on lines 37-42. Each time it is called a number is passed and that number is used in the output on line 40. When you are coding requirements for a program, put your code in the appropriate sections. For example, Requirement 1 code starts on line 15, Requirement 2 code starts on line 18, etc. Observe the output below to understand the code more fully.
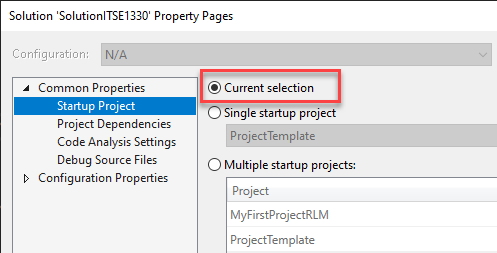
Run the ProjectTemplate project. What happens? You probably get output from MyFirstProjectRLM. That's because it ran. Notice that it is bold in the project list in Solution Explorer. We don't want it to always run. We could R-click on ProjectTemplate and select Set as Startup Project but we don't want to do that every time to run another project. Fortunately, VS provides a setting to make it convenient. R-click on the solution name and select Properties | Startuup Project | Current Selection. Now, the currently selected project will be bold in Solution Explorer and the bold project is the one that will run.
Output for ProjectTemplate.
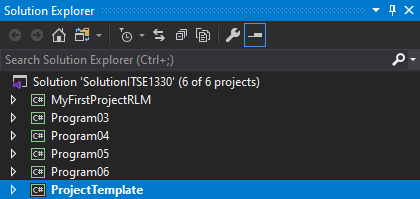
Notice that I just (very quickly) created four more projects (Program03-06). Next, I would copy the code from ProjectTemplate as previously mentioned. And voilà, four projects are ready to start. I recommned not creating beyond Program06 at this point since we will be using different templates for later projects. But suppose you did create a project with the wrong template. Uh oh! Will you have to take the course over? Not so. Simply delete the project created with the incorrect template and create a new project with the correct template. All is well.
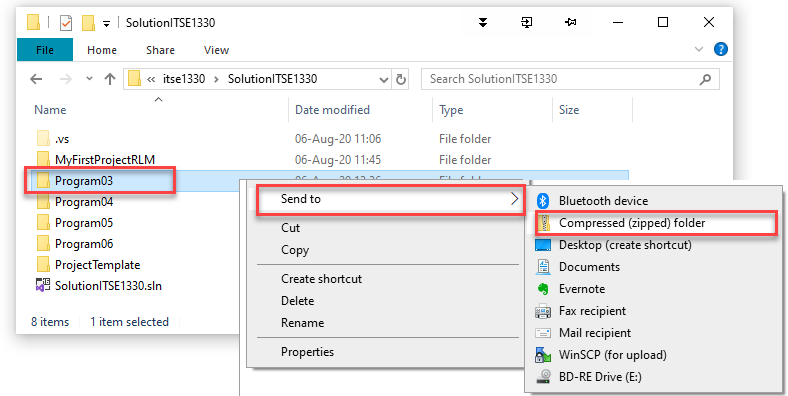
Open File Explorer and then open your SolutionITSE1330 folder. Notice the project folders within the solution folder in File Explorer. When you are ready to submit Program03, simply R-click on Program03 | Send to | Compressed (zipped) folder. That will create a Program03.zip file in the current folder. Submit that .zip file. Be sure to follow these instructions for credit.
What's Next?
In the next chapter, we consider the fundamental language topics of variables & data types.