

Windows Forms Applications
Foreword
We could justifiably continue using the console as our primary output stream. Many introductory courses limit coverage to the console for the entire course so the focus can be directed to the code. However, to provide initial exposure to the topic, in this and the next chapter, we will use Windows forms for application development. The console window is a very useful and productive interface for systems administrators, database admins, and web developers. Alternatively, most students and almost all working professionals are more accustomed to working with GUI (graphical user interface) applications. GUI applications can be considerably more intuitive and easier to work with for non-technical users.
In this chapter and the next we will use Windows Forms to build two GUI applications. Windows Forms is the GUI technology introduced with the initial release of .NET in Feb2002. When .NET 3.0 was released in Nov2006 a GUI technology was added named WPF (Windows Presentation Foundation). WPF is based on XAML (pronounced Zamil) which was a markup language developed by Microsoft. WPF is not covered in this course for a number of reasons including: Windows Forms .NET Core is covered, time constraints, and adequate coverage of WPF is a bit complex for an introductory course.
Event Driven Programming
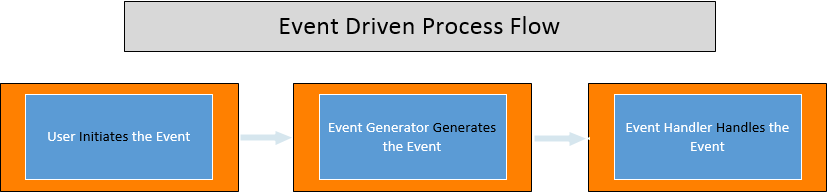
Graphical user interfaces operate on the event driven programming model. The application waits for an event to occur and it responds to (or handles) that event. Events are usually, but not always, initiated by the user. A common event initiated by a user is the Click event associated with a button. When the user clicks a button, s/he expects something to happen. The button responds to the click by generating a Click event. The Click event is handled by code in a method associated with the Click event for that button. The code that makes something happen is located in a method known as an event handler.
In VS, controls have a default event associated with them. For instance, the default event associated with a button control is the Click event. There are also many other events associated with controls that can be viewed in the Properties Window by clicking the lightning bolt (more on this below).
Building C# GUI Applications
There are a series of common steps that developers follow while developing C# GUI applications. The steps outlined below are not irrevocable, inflexible, or exhaustive. However, they represent a typical development pattern for a single-form application.
Before opening Visual Studio:
- List the requirements of the application
- Draw or construct a visual draft/sketch of the UI (user interface)
- Make a list of and name the:
- controls on the form
- classes associated with the application
- fields/properties of the classes
- methods of the classes
In Visual Studio:
- Add the controls to the form (name the controls as added per the list above)
- Modify the control properties in the Properties Window per design specifications
- Refine the form design (control alignment, form appearance, etc.)
- D-click on event generating controls to add event handlers to those controls
- Add the appropriate code to the event handlers
- Test and refine the code as required
The WindowsForms Application
We are now ready to begin developing a forms application. Select File | New | Project to add solution and project or R-Click the SoutionITSE1330 and add a new project as shown below. In the New Project dialog select Windows Forms Application .NET Core instead of Console Application that we have selected previously. Change the name to WindowsForms unless you have used that name already. If so, use a name of your choosing and select OK.

The VS IDE is a sophisticated and powerful development platform. But, that sophistication and capability come at the price of complexity. The tool can seem a little overwhelming to new developers. In this chapter and the next, we will step through a few introductory topics one-by-one and purposefully, but gradually, increase proficiency with the IDE.
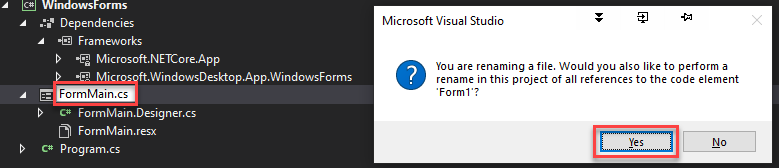
When the project window opens n VS, the first thing we want to do is to change the name of our form file from Form1.cs to a more useful and descriptive name such FormMain.cs. Rename objects as early as you can. Renaming is more challenging after code has been written to reference the objects. Visual Studio will make some automatic name replacements when a name dependency is changed. However, it is better practice to get the names right early, before extensive coding.
In Solution Explorer, R-click on Form1.cs and select Rename to change the file name which changes the form name.

Change the name of the form file to FormMain.cs. Renaming the references in code and controls is called refactoring which is the act of 'changing form without changing function'. Select Yes.
D-click on FormMain.cs to ensure the Properties window is showing properties for FormMain. Note: to make the Properties Window show the properties for a particular control, click on the control. BE CAREFUL not to D-click on the control because that produces code that you may not want (more on this below). The name is also changed in the Properties window which normally appears below the Solution Explorer. If the Properties window is not showing, select the View menu | Properties or Ctrl-W, P.
Make a few changes in the Properties window. Change the BackColor of the form, the font size, and the text. I chose 192, 255, 255 for the BackColor, 12 for the font size, Point for the font Unit, 500,800 for the form Size, and the Text property to Windows Form Control Examples.
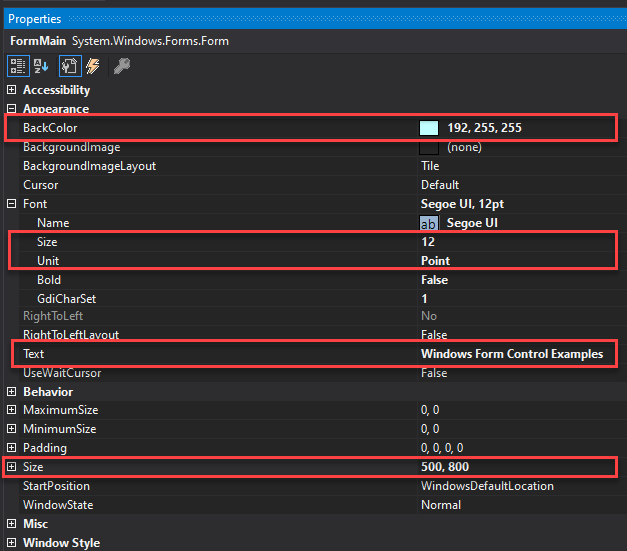
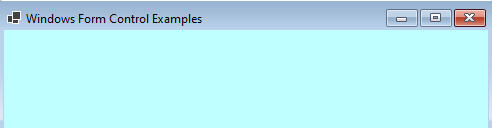
Notice in the image below the changes applied to the form after making those settings (full size not shown). Recall in our discussion on object orientation that objects contain two things: functionality and data. All of the properties shown for the form represent data elements of the form object. The properties can be set at design time (like we just did) or at runtime using the dot . operator (a.k.a. member access operator) which we will do the in the code segments.
Our goal is to build an app that demonstrates the VS GUI building process and implements a few of the controls available in VS. The general requirements are listed below. More specific details are provided as we build the application. Note that unlike the preceding chapters, we do not work with Program.cs in this or the next chapter. Instead, we work with the class file that VS studio creates for the form. In our case, FormMain.cs.
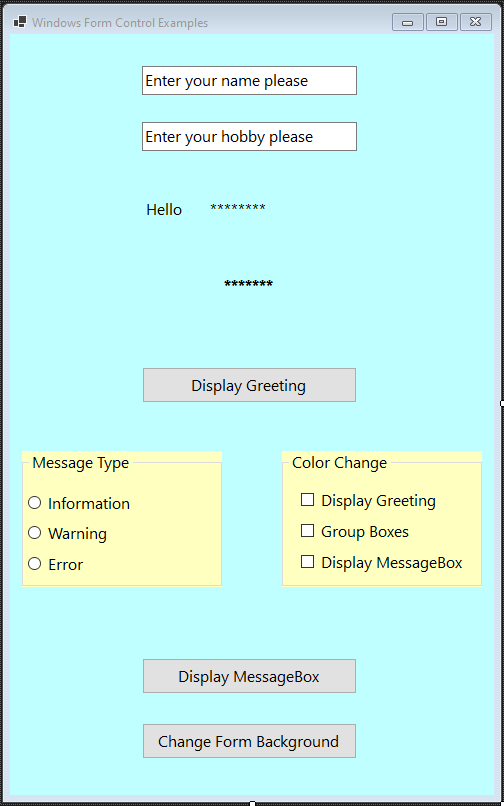
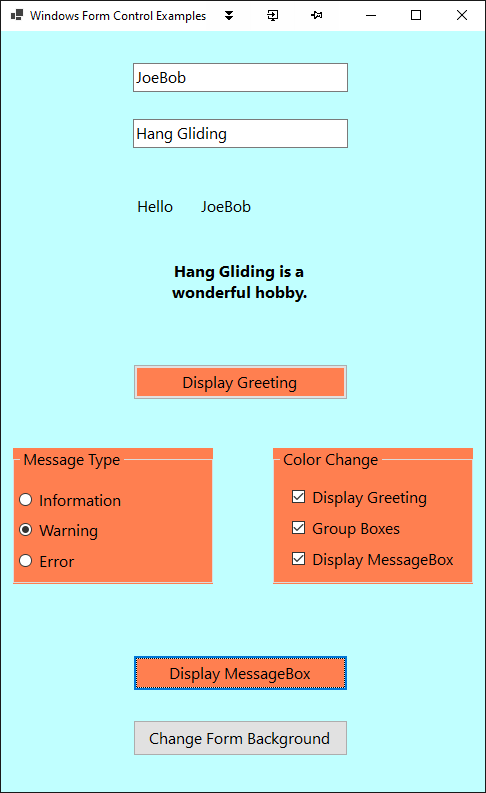
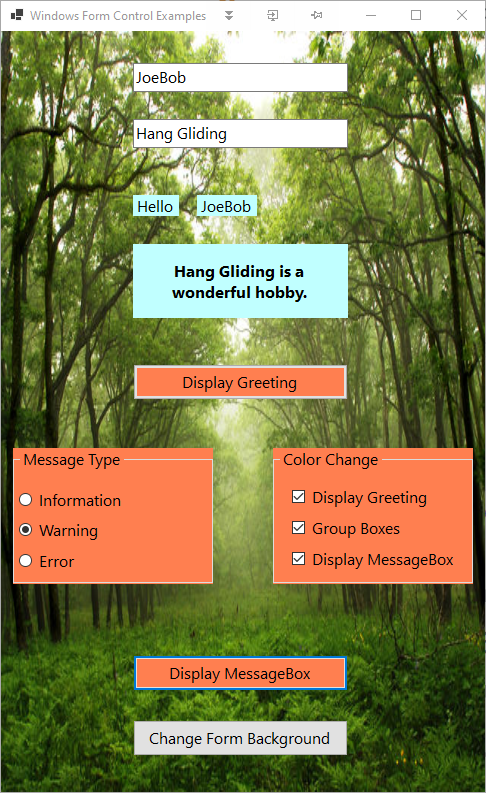
Application Requirements (see WindowsForms Finished State below)
- Two textboxes for name and hobby entry
- Three labels to display a greeting to the user using name and hobby
- One button to display greeting
- One groupbox containing three radio buttons to alter message type in a messagebox
- One groupbox containing three checkboxes to alter control background colors
- One button to display a messagebox and make changes based on radio and checkbox selections
- One button to change the form background to an image
Now we are ready to add a few controls (like buttons, labels, textboxes, etc.) to our form.
WindowsForms Finished State
Add the controls
See the image above labeled WindowsForms Finished State. That is our goal (along with the required functionality). Visual studio makes it very convenient to build GUI applications quickly. Let's begin adding the controls to reach the application finished state as shown. There are two ways to add controls to a form: dragging the control from the toolbox or D-clicking on the control in the toolbox. The steps below follow the requirements listed above. Use the image WindowsForms Finished State as your visual guide.
Implementing the Design Requirements
- Add two textboxes to the form; size and place as shown. In the Properties Window, change the names of the textboxes to something meaningful such as textBoxYourName and textBoxHobby. I recommend inspecting the code for the corresponding control name since the code is used to access the controls. There are a variety of opinions regarding control naming in VS. I prefer control name first followed by purpose but I will leave that to developer preference but keep in mind that control names on the form and in code must correlate. Set the Text property of each box to the values shown.
- Add three labels and name appropriately. Set the Visible property of each to False which means that the labels will initially not be visible on the form. When do you think the labels will become visible?
- Add a Display Greeting button.
- Add a groupbox to the form and THEN add three radio buttons to the groupbox. By adding radio buttons to the same groupbox, the buttons behave as a group in which one and only one can be selected.
- Add a groupbox to the form and THEN add three checkboxes to the groupbox.
- Add a Display MessageBox button.
- Add a Change Form Background button.
We are done. Well, not quite. We have completed steps 1, 2, and 3 in the In Visual Studio list above. You should have the visual design of the application complete. Step four in the Visual Studio list is "D-click on event generating controls to add event handlers to those controls". Of the 17 controls on the form, which ones do you think should generate events? That's right, our three buttons. We will take that step in the IMPORTANT section below.
Default Events
In VS, controls have default events associated with them. For instance, the default event associated with a button control is the Click event. When we D-click a control (DON'T do this yet), VS produces a starting point (a.k.a template or method stub) for that control's starting event. For example, I added a button to the form and D-clicked the button which produced the event handler template in form class file, FormMain.cs which is where we will do our coding. The sender argument is the object that generated the event (button1 in this case). The "e" argument contains details about such as size, location, etc.

BE CAREFUL when adding event handlers to your application. Since it is so easy to add the handlers to a control by D-clicking, it is therefore so easy to unintentionally add an event handler to a control by mistake. I will demonstrate this undesirable consequence and the steps required to repair it.
Removing an Event Handler
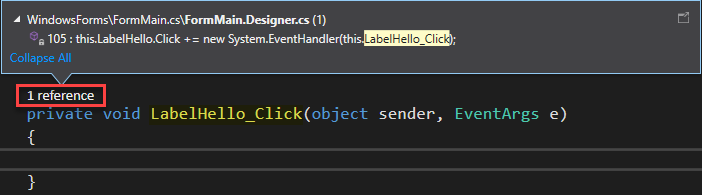
Suppose, by mistake, I D-clicked the LabelHello control on the form. The click event handler is generated in FormMain.cs as shown. Since it was a mistake, I want to remove the event handler. However, notice that a reference was also generated and that reference must also be removed. The reference is located in the FormMain.Designer.cs file. Normally, this file should NOT be modified. However, we need to remove the reference.
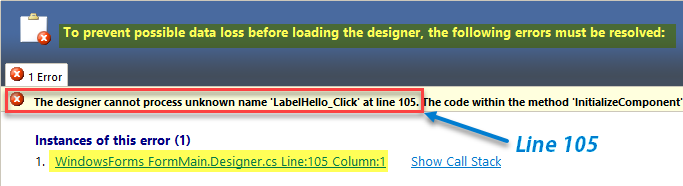
Let's see what happens when I remove the event handler but do not remove the reference. I just removed the event handler in FormMain.cs and clicked on the FormMain.cs [Design] tab to open the design view and received the error below. This means that the reference in FormMainDesigner.cs still exists but the event handler not longer exists in FormMain.cs. The error is on line 105. From this window, I click the highlighted link to open FormMainDesigner.cs.
FormMainDesigner.cs opens at line 105 from the click above. I remove the error line below, Ctrl-s to save, and close the file. The form then appears as it should in design view. Note: this event handler and reference removal process can be a little quicker by D-clicking on message "105: this.LabelHello.Click..." when the reference popup appears in FormMain.cs. That will also open FormMainDesigner.cs directly at the appropriate line.

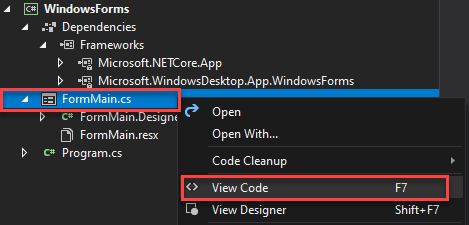
IMPORTANT
In previous chapters, you were able to code the examples provided, save, and test. However, forms development is different due to the use of event handlers. There are a number of approaches and you will discover favorable techniques as you gain experience. At this point, I recommend being very deliberate and D-clicking each button in design view. That action creates the event handler in BOTH FormMain.cs and FormMain.Designer.cs. After the eventhandlers are in place, add the remaining code to FormMain.cs from the example provided. You should now be ready to D-click each button to create the three pairs of event handlers. D-clicking on FomrMani.cs in Solution Explorer opens the file in Design View, to open Code View, R-Click on FormMain.cs in Solution Explorer and select View Code (or select F7). You can also R-click on the form in Design View and select View Code.
Coding the Method Requirements
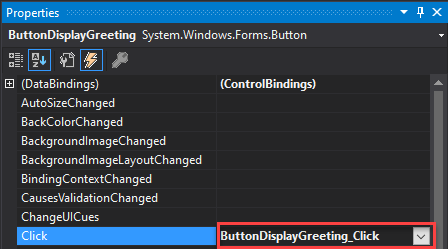
In addition to adding event handlers by D-clicking controls, event handlers can also be added via the Events View in the Properties Window. To see events associated with a control instead of the control properties, select the lightning bolt as shown. To code a particular event or navigate to an event that has been coded, simply click the event in the list.
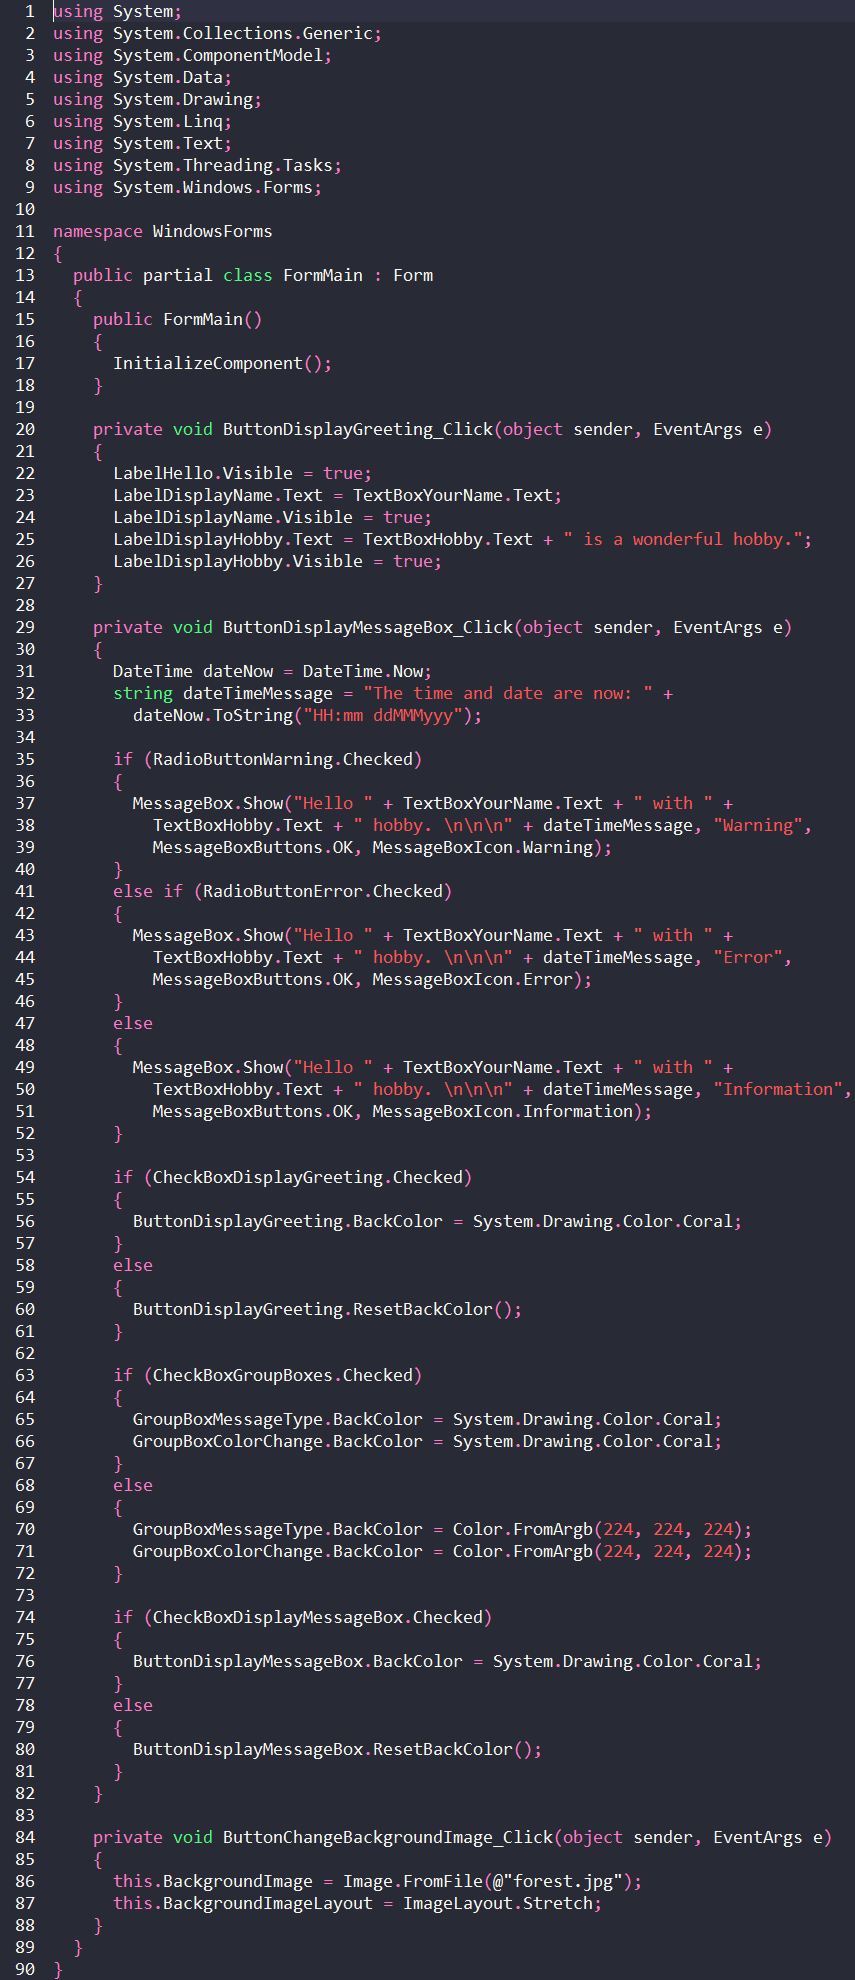
Back to our three buttons. Let's code the Display Greeting button first. In design view, D-click to add the event handler. This is the first time we have seen FormMain.cs, the code behind file for the form we designed. Line 13 specifies that this will be a partial class which means that the code for the class will be in multiple files (FormMain.cs and FormMainDesigner.cs). The ": Form" on line 13 means that FormMain inherits from the superclass Form. By doing so, our form contains all of the fields, properties, and methods in the Form super class. Lines 15-18 contain the constructor for the form. There is a call to InitializeComponent() which is in the FormMainDesigner.cs file. That is the method that contained the undesired reference we removed above.
On lines 22, 24, and 26 the Visible properties of the labels are set to true. On lines 23 and 25, the Text properties of two labels are set using values the user supplied in the textboxes. So, when the user clicks the Display Greeting button the labels will be shown with the appropriate greeting. You should test this functionality and address any errors.
We are now ready to code the Display MessageBox event handler. In design view, D-click the button to produce the template. On line 31, a DateTime object is created with the current date and time (Now). On lines 32 and 33 the string dateTimeMessage is created which will be added to the messagebox displayed.
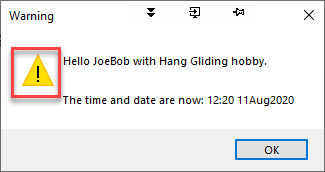
Lines 35-52 contain if-else-if-else statements corresponding to the radio buttons. Radio buttons enforce mutually exclusive behavior which means that only one can be selected (much like an actual radio button tunes the radio to one station at a time). Line 35 checks to see if the raidoButtonWarning button is checked. If so, the static Show method of the MessageBox class is called with the appropriate settings. Inspect the arguments to ensure you understand their purposes. More coverage of the MessageBox class can be reviewed here.
Line 47 is a simple else (a.k.a trailing else) which will be executed if both of the prior two checks are false. Notice on the form that the Information icon is the default setting. Note the different icons produced when the MessageBoxes are displayed based on the radio button selected.
Lines 54-82 contain three if-else statements that are asking which, if any, of the checkboxes have been selected. Unlike radio buttons in which one and only one from the group can be selected, none or all of the checkboxes can be selected. What is being performed in each of the else statements in lines 54-82? What is the observable effect on the controls?
The last button we need to code is the Change Background button. Notice that this on line 86 refers to the current object which is the form.
Summary
In this chapter we reviewed the common steps to building a C# GUI application. When developing your applications, it is important to follow these steps or a similar process. The WindowsForms example demonstrated six different types of controls and the use of the Show() method of the MessageBox class. The event generator and event handler relationship was covered and demonstrated with three event generating buttons.
Testing the Application
Be sure to thoroughly test your application by altering the radio button and checkbox combinations. In the WindowsForms Test Output below, the Warning symbol is shown in the messagebox and all three checkboxes are selected thereby changing the targeted controls. In the Background Image Change example shown, we see the image in the form background.
WindowsForms FormMain.cs
WindowsForms Test Output
WindowsForms MessageBox
Background Image Change
What's Next?
In the next chapter we take a look at a few of the database concepts in a data connected C# application.