

Getting Started
Above All Else - Code
There is a great deal of material to cover with C#, even in an introductory course. Instead of initially considering theoretical foundations, the first thing we want to do is get started writing code. To learn software development or a new language, there is no substitute for exposure to the craft of coding. We will use the powerful Visual Studio Integrated Development Environment (IDE) throughout the course. However, in this first section, we will get back to basics by writing code in a simple text editor and then using the command line to call the C# compiler to convert our source code (.cs file) into an executable file (.exe file). Naturally, professional software developers would almost always use Visual Studio to construct C# programs. But developers should also be familiar with command line compilation.
HelloWorld1 - Using cmd.exe
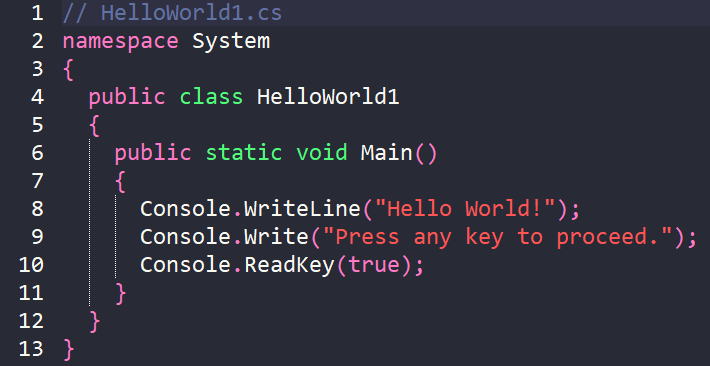
Let's begin by writing a "Hello World" application in a simple text editor. Any simple text editor can be used. I recommend Notepad++ which is available as a free download. Open your text editor and enter the code shown. We will devote more time in subsequent chapters to these concepts. The two slashes on line 1 indicate that all the remaining text on the line is a comment. In this case, the comment is the name of the program/file. Line 2 (and the accompanying braces on lines 3 and 13) identifies a namespace block which is a name segmentation convenience. Namespaces help organize code and prevent naming collisions. By using the System namespace, we do not need to precede (or qualify) the Console object on lines 8-10 with "System.Console". We can omit the "System" name since we have signaled to the complier to look in the "System" namespace for the "Console" object if it is not found in the local file. Try commenting lines 2, 3, and 13. You should receive an error that Console is not recognized. With the namespace System, C# recognizes Console.
On line 4, the class name of the program is specified. This is also the name of the file (without the .cs) that will contain the program executable file (HelloWorld1.exe). The keyword public on lines 4 and 6 specifies that this program can be called (or started) externally to the class. Lines 6-11 contain the essence of this program. The keyword static specifies that the Main method belongs to the HelloWorld1 class and not an individual object instantiated from the HelloWorld1 class. - I know. - These terms are probably unfamiliar to you and it seems like a lot at this point. We will cover the concepts again and again. Also, after repeated study of and exposure to the material, the information becomes more clear. Lines 8 and 9 write messages to the command line console using string literals which are enclosed in double quotes. They are called literals because their value is "literally" apparent and specified (unlike string variables which we cover later). Line 10 is used to accept a keypress input and terminate the program.
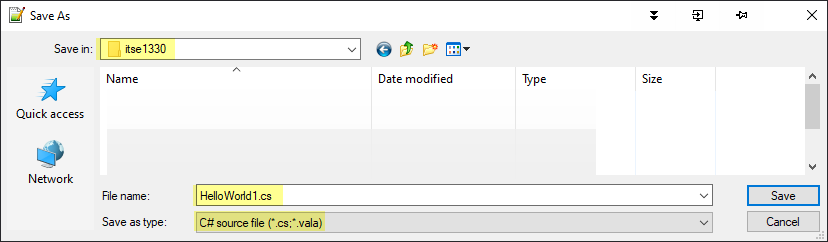
After coding the above, save it as HelloWorld1.cs in a folder you create to contain your course work. I created C:\repos\itse1330 for this purpose and recommend you do the same. Repos is short for repository which is a term used by online code storage facilities such as Github and Bitbucket.
Unlike Java, C# does not require the file name and class name to be the same but that is a good practice. Note: If you are using an ACC computer, it is imperative that you create and use a directory at C:\ for project storage and NOT the desktop, user documents, or H:\ drive. Machines in ACC computer labs are managed assets and therefore use virtual links for the locations mentioned. The virtual links usually are redirected to network storage which can cause problems with Visual Studio.
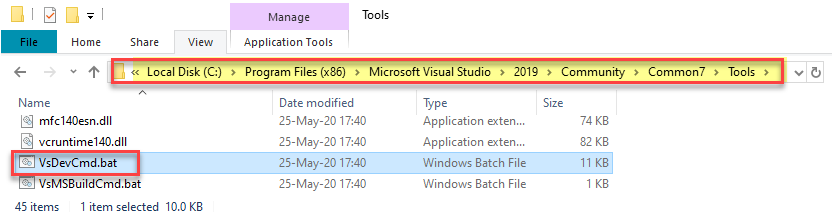
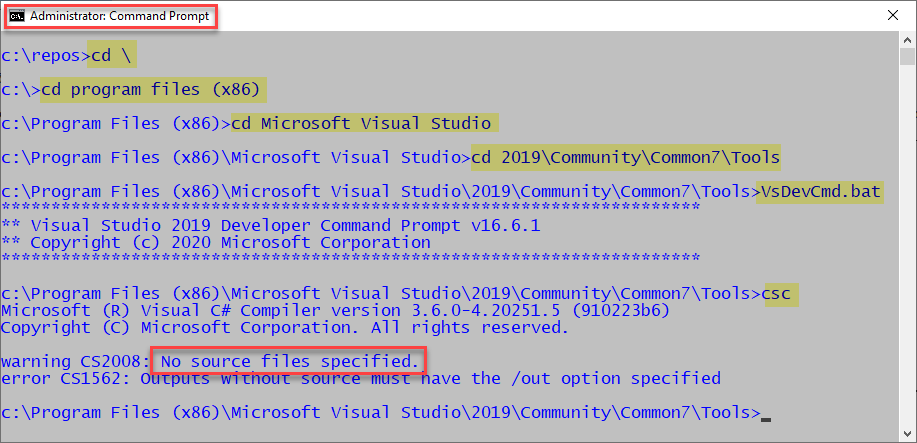
Before we compile/run/test our code, we need to set up environment variables for C#. Fortunately, that task has been simplified for us by running VsDevCmd.bat (vcvars32.bat in some earlier versions of VS). Navigate to the location where you installed Visual Studio and then into the folder as shown.We want to run the VsDevCmd.bat file which we can do by double-clicking the file. D-click the file to run it. You may see a cmd window flash but you will have no other apparent indicaiton that the file ran.
By the way, .bat stands for 'batch' which is a script file that can be run (executed) by the command interpreter (part of the command line program we will now start).
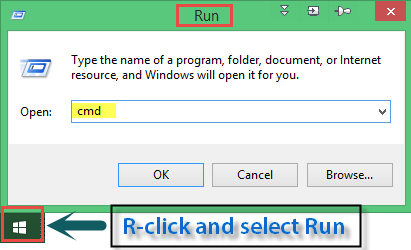
In computing, there are usually many ways to accomplish a task. For instance, the command tool (a.k.a command line or command prompt) can be opened by R-clicking the window icon in the lower left corner | Run | cmd | OK as shown. The command tool can also be opened by clicking the Command Prompt icon on the Windows Start page. You can set the starting directory in the properties dialog as shown.

Note: If you cannot locate the file "VsDevCmd.bat", "vcvars32.bat", or "vsvars32.bat", in your installation, skip to the section "HelloWorld2 - Using Dev Prompt" to use the development command tool that ships with VS 2019.
Open a command prompt as shown. It will open to a default folder (C:\Users\Rudy for me). The ">" is actually the prompt (prompting for some form of entry). We use "cd /" (or \) to "change directory" to the root directory which is C:\. We then need to cd to the folder where the file VsDevCmd.bat resides which is "C:\Program Files (x86)/Microsoft Visual Studio/2019/Community/Common7/Tools" on my machine. By the way, the backslash "\" was the original directory separation symbol in windows. The command window will now accept either the backslash or forward slash. We run the file VsDevCmd.bat by typing the name at the prompt and pressing enter. This sets a few environment variables required to use the C # command line complier. After running the file, the command line returns. Type csc for "C# Compiler" on the next line and press enter. This starts the compiler but notice we receive a warning that no file was specified. We will do that next.
Now we are ready to compile, run, and test our code.
Type cls and enter to clear the command window. Then type cd \ to navigate to the root folder. Then cd to repos and then cd itse1330.
Type csc HelloWorld1.cs and press Enter. If successful, the compiler will create the file HelloWorld1.exe in our folder which occurred for me. We are ready to run/test our program by typing HelloWord1.exe (the .exe is optional). We get the Hello World! output we expect and Press any key to proceed whichs ends the program.
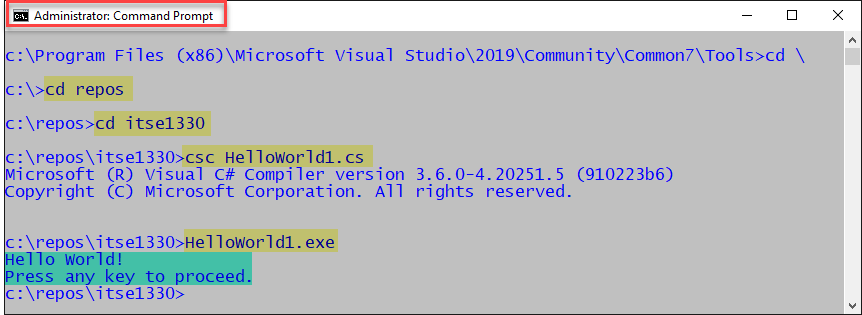
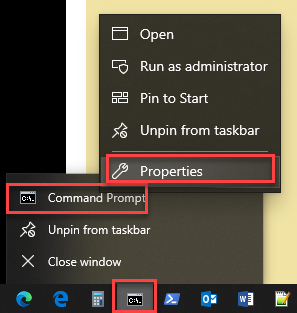
As an aside, notice in the red box that I am running the command prompt as Administrator for one time by selecting Run as administrator as shown. For a persistent setting, you can set your Command Prompt to run as Administrator by R-clicking the icon on the tool bar | R-Clicking Command Prompt | Shortcut | Advanced.
Congratulations. We have successfully written the source code for a C# program in a text editor. We used the command line to access the compiler to create an executable and run/test the program in the command window. The .exe executable file can be run on any Windows computer with the appropriate .NET framework (version 4.5 in this case).
HelloWorld2 - Using the Developer Command Prompt for VS 2019
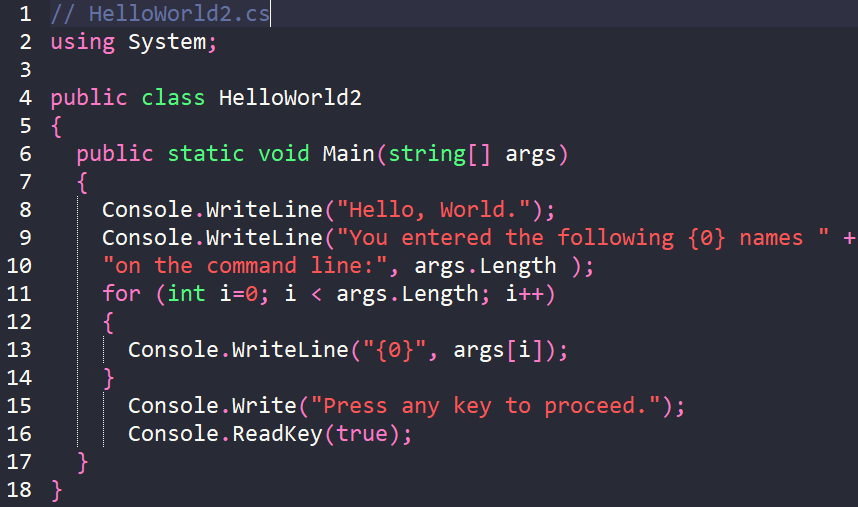
Let's expand our program to accept arguments from the command line. And, instead of the standard Command Prompt, we will use the Developer Command Prompt for VS 2019 that ships with VS. But first, code the HelloWorld2.cs as shown.
A new technique to observe is on line 2. The using directive tells the compiler that a specified namespace is being used in the file. If the compiler encounters a class name that is not defined locally (e.g. Console), it checks namespaces specified by using directives. In the case below, Console is declared within the System namespace so all is well. We accomplished a similar objective in HelloWorld1.cs by using the namespace keyword. In upcoming chapters, we will commonly employ the using directive to include classes from the .NET Framework Class Library (FCL). The FCL enables .NET developers to access system functionality via large collections of predefined classes and types. Typically, when classes from the FCL are used, we must also add a reference to the class. That is not required when using System since it is included in the mscorlib.dll (common object runtime) file which is automatically referenced by the compiler.
A compiled project (.exe or .dll) is called an assembly. Classes compiled in the same project (assembly) do not require a special "using" directive due to the co-location of the classes. When classes are compiled in the same project (assembly), they are considered to be in the same namespace (which is the name of the assembly). We will cover this again when using Visual Studio.
The next point to discuss is on line 6. The "string[] args" is included in the Main method header to accept arguments (or additional items) that are added on the command line when the program is being run. For instance,
when we run HelloWorld2.exe, we will also include four names to demonstrate how command line arguments work. args[] is defined as an array which enables storage of more than one item. On line 9 we see a couple of first uses. The "{0}" is a placeholder for the value "args.length" which is included after the string. In this case, the string spans two lines in the editor so a string continuation is provided by the "+" sign. Lines 11-14 use a "for loop" to iterate (or loop) through the argument list. More on iteration later. On line 13, each of the arguments supplied on the command line are written back out to the command window when the program is run which we do next.
Instead of the basic cmd.exe window we used above, we will now use a tool provided by Visual Studio. To use the Developer Command Prompt for VS2019 (DCP) that ships with VS2019 search for "developer command" from C:\ as shown. If we planned to use this tool frequently, we would copy a shortcut to the taskbar or some other convenient location such as the itse1330 folder. D-click to open the DCP. cd to your project location to run your files.
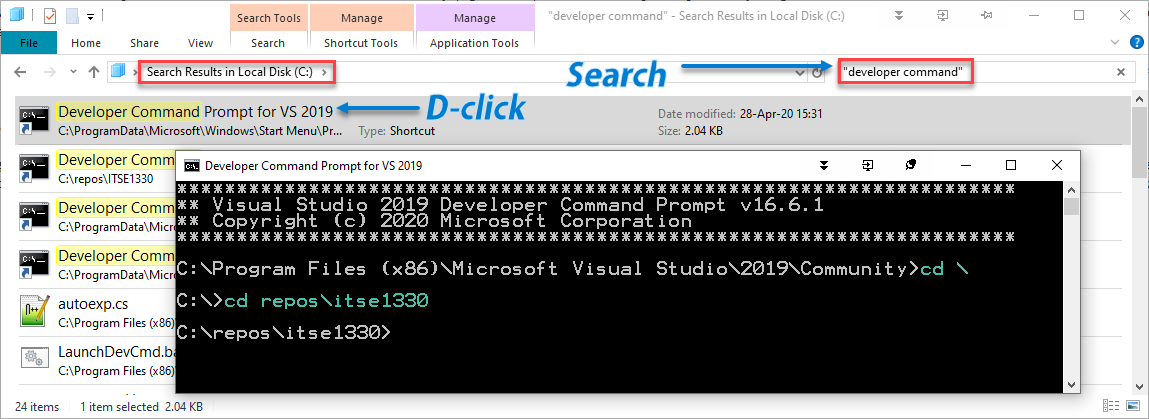
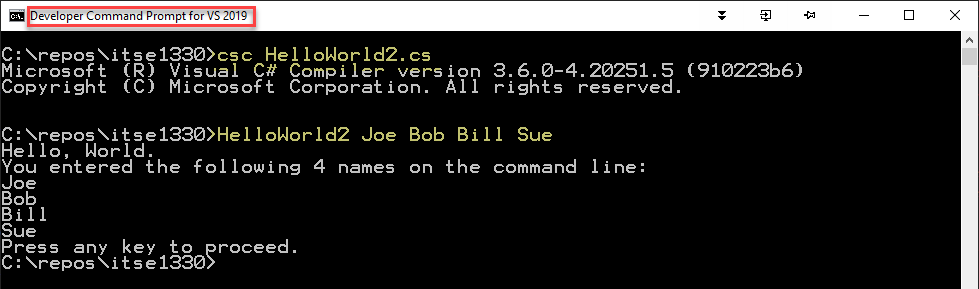
I recommend that you make a shortcut of DCP and place it in your itse1330 folder. D-click the DCP to open it. Notice that Commnand Prompt title now reads "Developer Command Prompt for VS 2019". When this tool is used, the environment variables are automatically set which is a nice benefit. For instance, the compiler is natively visible to this tool. CD to our project folder and compile our new program. After a successful compilation, run the program and supply a few names as shown. Confirm that the output matches the code listing. Notice the value "4" is supplied by args.length in the code. Each of the names were entered into the args[] array and were output back out to the command window by line 13 in the code listing.
Now that we have a little experience with C# code, let's take a look at the .NET Framework to understand the technical architecture of the environment.
What's Next?
We now have a little experience with writing, compiling, and running C# programs. In the next chapter we discuss the essential components of the .NET Framework and consider the roles they play in the .NET workflow.